Launching a continuous phishing campaign on Phin's platform is quick and easy. Below we show you how!
There are two ways to create a continuous phishing campaign on Phin's platform:
Continuous Campaign Creator
Step 1: Finding the Continuous Campaign Creator Button
If you aren't already at the home screen of the client portal, start by navigating to the home screen. From here, you can select the Create Continuous Campaigns tile.
.png?width=688&height=382&name=Phin%20Security%20_%20Phishing%20Campaigns%20(16.04.2025%2008_34).png)
Step 2: Creating a Campaign with the Continuous Campaign Creator
Now, you can begin using the campaign creator tool and begin the campaign creation process.
.png?width=688&height=382&name=Phin%20Security%20_%20Campaign%20Editor%20(16.04.2025%2008_32).png)
You will be prompted to check any applicable boxes shown above. These will help build out both a continuous phishing and continuous training campaign. How you answer the questions will determine the curriculum for the training and the templates for phishing.
Answering these questions builds a unique profile for this specific campaign and client. You can create multiple continuous campaigns and answer questions differently for each if you'd like more targeted training & phishing based on audience groups.
Once you've reviewed the curriculum page, click Next to move to the scheduling page. The soonest a campaign can be scheduled to send is 24 hours in advance. This is done by adjusting the "Send first training on" date seen below.
%20(1).png?width=688&height=127&name=Phin%20Security%20_%20Phishing%20Campaigns%20(16.04.2025%2008_37)%20(1).png)
Here, you will see scheduling for both Training and Phishing campaigns one at a time. All training is set to monthly on the 1st Monday of the month by default.
You have the option to configure a schedule that best suits your company's phishing needs on this scheduling page. This includes the frequency, phishing window, and start date.
Find out more about how phishing campaigns are delivered here.
For instructions on how to change the sending parameter of a campaign, click here.
Once you have set your desired schedule, all you have to do is click Submit!
Custom Continuous Phishing Campaigns
If you're looking to create a Continuous Phishing Campaign, but you'd like more control over the templates within that campaign, this is the section for you. We will discuss how custom continuous phishing campaigns work and how to launch one.
Step 1: Finding the Custom Continuous Phishing Campaign Creator
If you aren't already at the home screen of the client portal, start by navigating to the home screen.

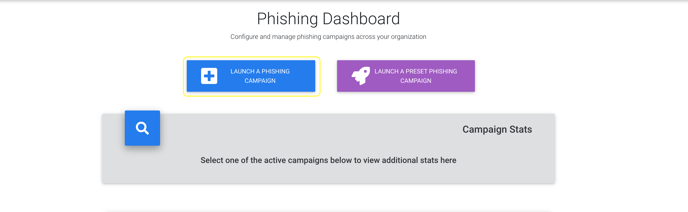
Once here, we need to get into the Phishing Dashboard.
- Getting to the dashboard via the left-hand side menu.
- Start by clicking on Phishing in the left side hand menu.

- Once the drop-down menu appears, click on Campaigns.

- Start by clicking on Phishing in the left side hand menu.
Now that you're in the Phishing Dashboard, you will see two buttons at the top of the page. Click on Launch a Phishing Campaign to go into the custom campaign creator tool.
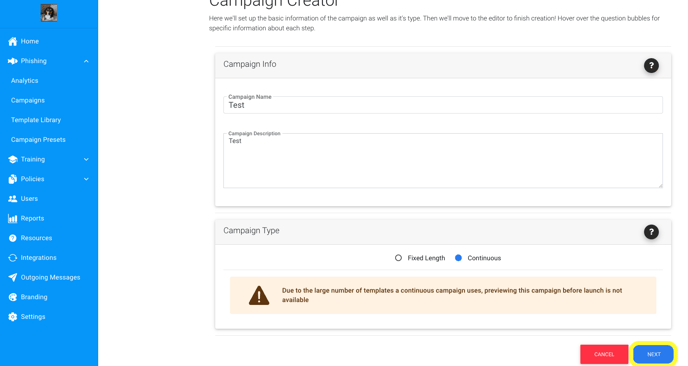
Once within the custom campaign page, you will see two sections...
- Campaign Info
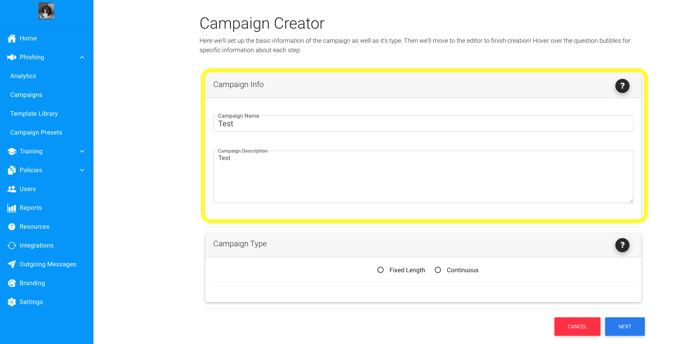
- Campaign Type
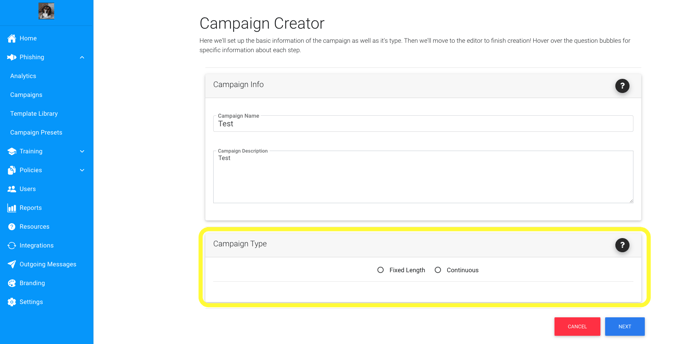
Feel free to change the Campaign Info to a name and description that best fits your goals for this custom phishing campaign. Once you have your Campaign Info set, go ahead and select Continuous for the campaign type. This will begin the process of creating a Custom Continuous Phishing campaign.
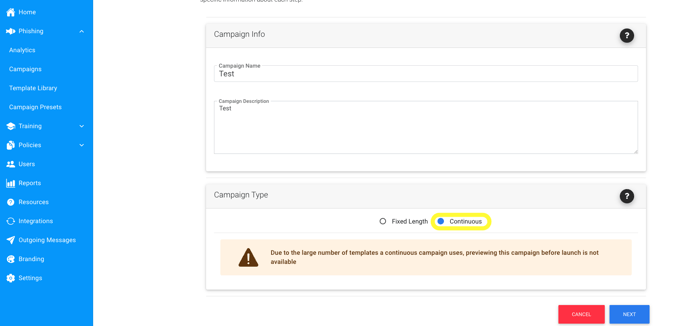
The final step will be to click next to begin creating this campaign, which we will dive deeper into in Step 2.

Step 2: Creating the Custom Continuous Campaign
If you skipped the above steps, make sure you've gone through the following steps:
- Navigated to the Phishing Dashboard
- Launched the Custom Phishing Campaign Tool
- Set your Campaign Info
- Selected Continuous Campaigns
If you successfully went through all the above steps, you should have just clicked the Next button seen below,
which will bring you to the following page...
Configuring custom campaigns is easy to do! Just follow the steps below.
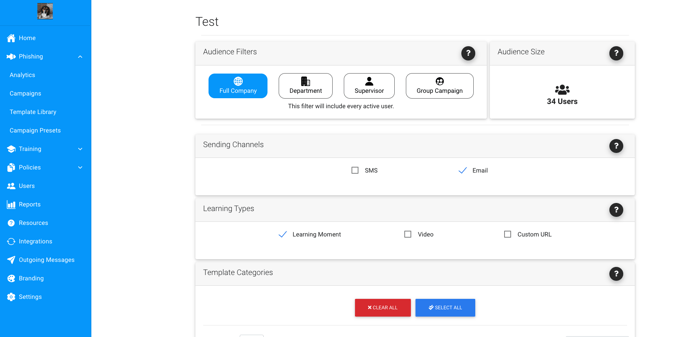
- Select an audience
- The first step to this campaign is selecting the audience you'd like this to deliver to. You can choose any option that best fits your goals for this custom campaign.

- The first step to this campaign is selecting the audience you'd like this to deliver to. You can choose any option that best fits your goals for this custom campaign.
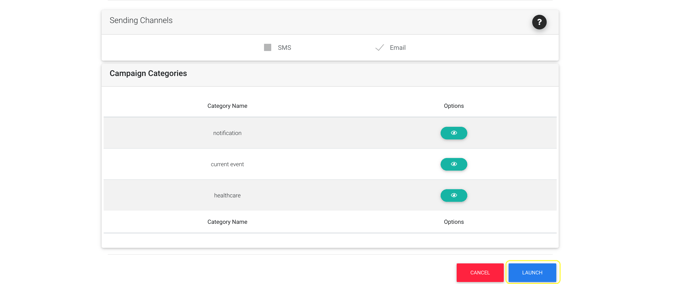
- Select your sending channels.

- Select your Learning Type(s).

- Select the Template Categories to be included.
- Selecting the template categories determines what types of phishing are included within this custom campaign. Make a selection by clicking on any of the + buttons. You will know when a selection has been made when you see a green check!
-1.png?width=688&height=335&name=Phin%20Security%20_%20Campaign%20Editor%20(15.04.2025%2013_28)-1.png)
- Selecting the template categories determines what types of phishing are included within this custom campaign. Make a selection by clicking on any of the + buttons. You will know when a selection has been made when you see a green check!
- Select your Publish Options
For custom phishing campaigns, you have two options for publishing a campaign.- Save and Launch
- Private Preset
This tool allows you to save this custom campaign as a Private Preset. Saving a campaign as a Private Present allows you to launch this same campaign to this specific client in the future without having to recreate the whole campaign again.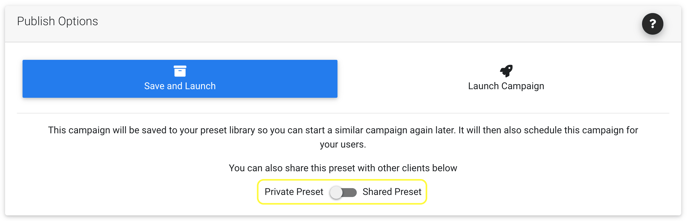
- Shared Preset
A Shared Preset will save this custom campaign to all of your clients in your portal. This does not mean it will deliver to all of your clients. It simply saves the preset as an option for all of your clients. Saving you time from creating the same campaign over and over again for multiple clients.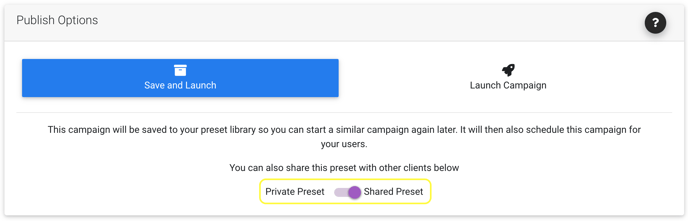
- Private Preset
- Launch Campaign
Launching a campaign without saving means you will not be able to easily launch this custom campaign again. You will need to recreate the campaign from scratch.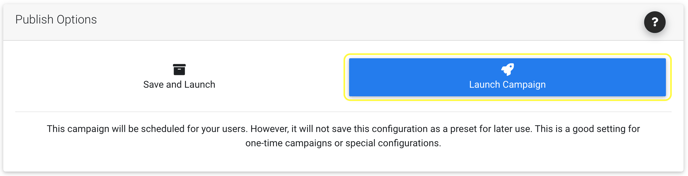
- Save and Launch
- Once you have made all of your selections, click Next.
- You will now be brought to the Campaign Launcher page. Here, you will see the scheduling tool and a summary of the selections you made on the configuration page.
-1.png?width=688&height=215&name=Phin%20Security%20_%20Campaign%20Editor%20(15.04.2025%2012_04)-1.png)
- Set the schedule to the perimeter that fits your goals for the campaign.
- Review the sending channels and templates selected.
- The last step is to click Launch!
Summary
We have looked at how to create both a Continuous Phishing Campaign and a Custom Continuous Phishing Campaign in this article. If you have any further questions, don't hesitate to reach out.